Tips & Tricks for Concrete Crafting
For many the idea of being creative with concrete brings visions of huge metal mixers, shovels and mess. Let me show you some of my Tips and Tricks for Concrete Crafting so you too can make concrete art, like baking a cake.

It’s no mystery that I have quite the love for working in concrete. My fascination with casting things from molds started as a little kid and led me to this. Before I knew it I had used a bunch of different Concrete mixes, made my own and created quite the slue of original projects. I learned from ‘hands-on’ experimentation to create my own easy system that makes it all mess free and simple.
“What is concrete?”
The term ‘concrete’ is for a material that is created from a mix of aggregates with a cement that is activated with water. Once it goes through it’s reaction, which usually involves some heat production it ends up almost as hard as stone. Lime-based Portland cement is commonly used and mixed with gravel (crushed stone) to make the typical mix used for your sidewalks. But as a crafter I often use a finer mix but there are still a few to choose from.
Question: “What concrete mix should I use?”
I get many questions about this. If you get the wrong mix, it will usually not work. Many of my projects are designed with the character of the mix. This post will also help explain the pre-made mixes.
Portland Cement
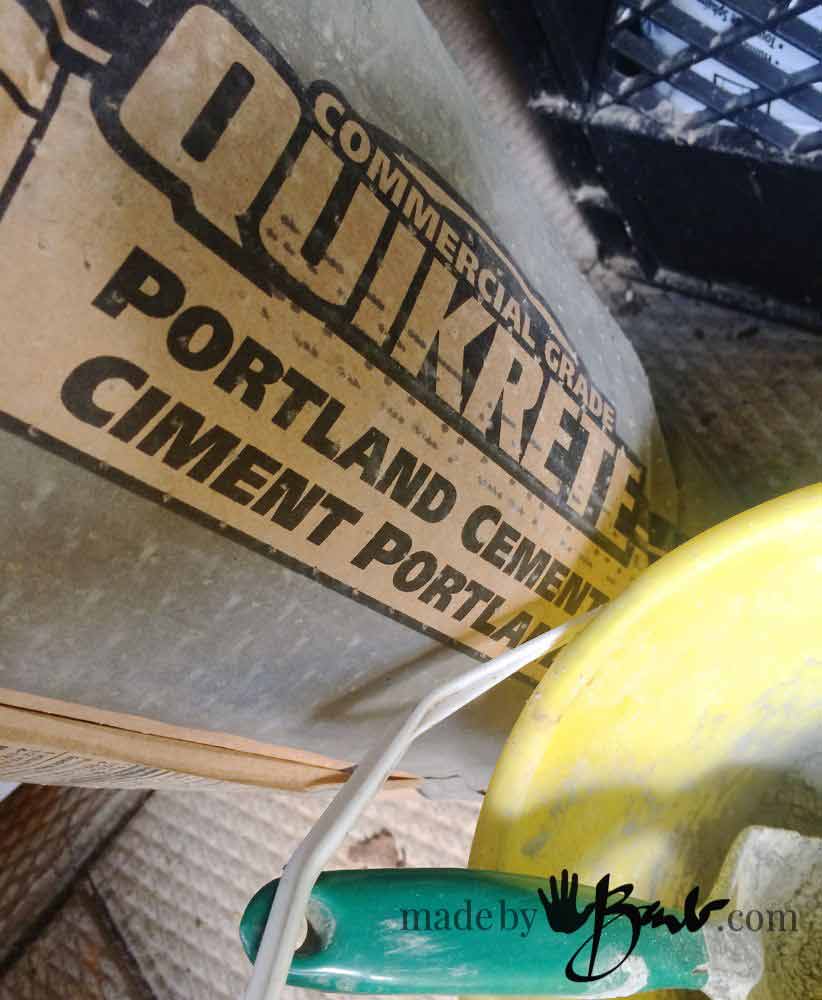
Portland Cement can be purchased as is so that you can make your own mix by adding other aggregates. It is also used when making ‘HyperTufa’. Depending what you mix into the portland cement will determine the final characteristics. It can range from just sand to perlite, peat, vermiculite, paper, styrofoam and probably more I’ve yet to discover.
If you want total control, this would be your choice as you are starting from ‘scratch’. I use this when making the CONCRETE ORBS using some dipping of yarn, and also the STEP SPOOK. In those cases the fabric fibres are the ‘aggregate’. Paper can be used as an additive and works quite well as in my PAPERCRETE BIRD

Sand Topping Mix
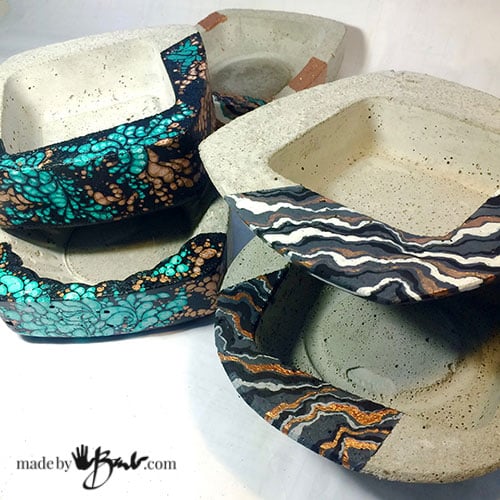
Sand Topping Mix is also one of my favourites. It is a simple mix of portland cement and sand. This inexpensive mix is meant to be used at less than 2″ thickness so it was perfect for the STEPPING STONES which were my first concrete adventure many years ago. They still grace my garden and are aging nicely. It has a fair strength when used at thicknesses over 3/8″ and worked well for the making of BOWLS and LIVE EDGE BOWLS and casting LEAF PLANTER. If you are new to concrete this is a good way to experiment. It can not be used at a very thin thickness.
Setting time is not accelerated and will need a good 24 hours before unmolding.

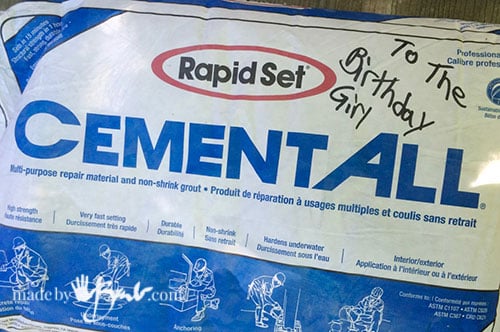
RapidSet Cementall
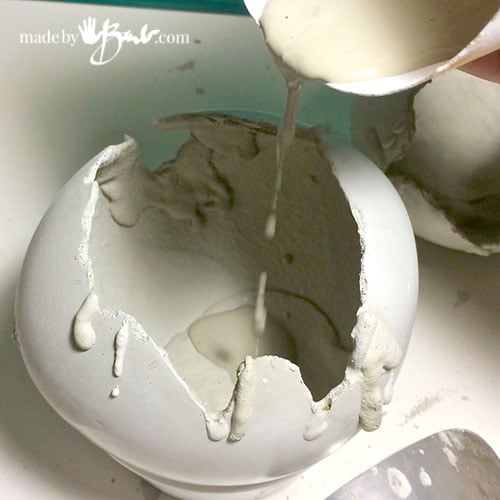
Rapidset Cementall is a brand name for a quickset concrete. This mix acts quite differently as it sets really quickly (5 minutes) and can be unmolded in 1 hour. I love this mix since I am impatient, but also because it is super strong! I experimented and have used it at 1/8″ thick with good strength (obviously not walking on) as it my LEAF COASTERS. This mix can be used at different consistencies such as pourable or thicker malleable concrete. This pourability has allowed the ‘slush pouring’ of the CUTE HEADS and the TIN CANS, and even the EGGS. Thicker use has allowed the sculpting of the LEAF CIRCLES and the hilarious SMILING STONES and LARGE FACE SCULPTURE. Even the GEODES and GEODE LAMP used this mix!
There is something about this mix that does make the end product much finer though, as there are many additives to set it quick and add that strength. If you like the more rough industrial look this concrete has less of that since the aggregates are very very (powdered sugar-like) fine. Those are decisions you have to make. It is also more expensive due to those ingredients.


If you would like to see side-by-side comparison of a few mixes visit my post about fast-set and extra strength mixes.

Top’n Bond
Sakrete Top’N Bond is a form of a patching concrete which makes it adhere to existing concrete. It is sometimes called vinyl patch as there are added polymers. It has a good strength at minimal thickness and also some has malleability. The final product does have the coarser texture since there is sand in the mix. It has a medium setting time so it worked well for the GIANT ORBS since they are worked in stages.
“What do I need to Work with concrete?”
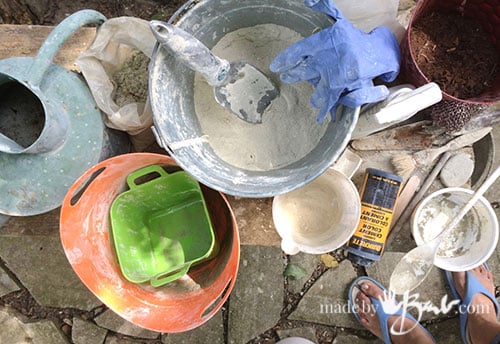
This is a what my collection of concrete ‘stuff’ looks like. It is really quite simple and I have quite the system now.
- Watering Can – is great as it just needs a bit of a tip to dispense, no fussing with a hose.
- Bucket of Concrete Mix and Scoop – keep this scoop dry and in the container to be able to add mix when needed.
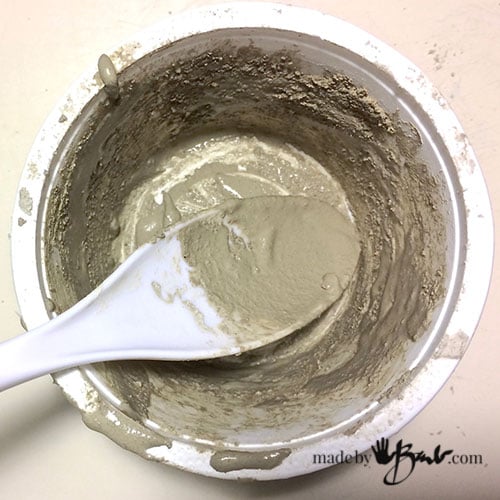
- Plastic Mixing Containers – It is best if these are not too rigid (Yogurt containers work well). Wider containers are better for mixing than tall ones.
- Measuring Cup to dispense small amounts of water into the mixing container.
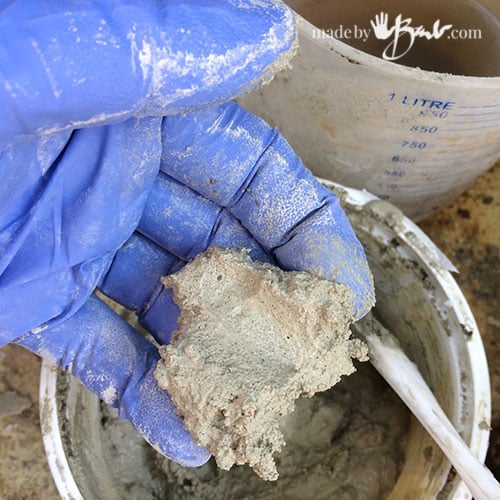
- Rubber or Nitrile Gloves – better quality makes them last longer.
- Dust Mask – rated for concrete silica dust I like my 3M8833 as it has an exhale valve.
- Spray Bottle with water – to mist when adding to existing dry concrete
- Mixing Spoons/Utensils – Plastic or wood
- Concrete Colour – if you would like a darker or tinted colour ( acrylic paints can work as well)
- Optional; Additives – if making a custom mix like Hypertufa or Papercrete; peat, sand, perlite, vermiculite, paper fibres, etc.
- Other Tools – like brushes, sticks, skewers, depending on project
“How To Work with Concrete and not make a big Mess?”

Step #1
Use the scoop and place some ‘mix’ into the mixing vessel
Step #2
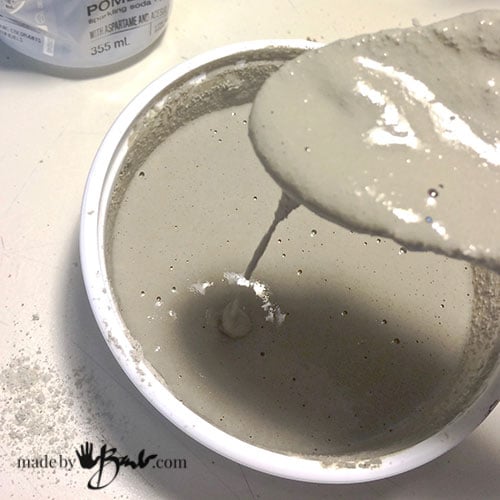
Use the measuring cup to add water slowly, mixing after each addition. The consistency that is needed will depend on the particular project and type of mix. The Rapidset Cementall works better if the water is added first. (each project tutorial also has details) Then follow the instructions to make your ‘great concrete project’.
Step #3
Do not wash anything, just let it set and dry. NEVER EVER wash it down the drain! It’s like NOT doing the dishes… We are not making a sidewalk here, usually just smaller craft objects.

Step #4
Once it is hard, just flex the container and the concrete will chip off. Bang it a bit and it will be clean enough for the next use. I like to use recyclable yogurt containers. Plastic buckets work well if you are working a bit larger scale.

Flex the spoon as well and it will become clean too.

Keep a bucket for all the cast off concrete. It can be used as aggregate later on or other planting uses. No mess or fuss!
“How do I make the concrete stronger?”
There may be times where you need a bit of assurance that your project won’t just crumble into pieces. In the big professional world they use steel rebar rods inside the concrete. We can use other methods of adding some reinforcement.
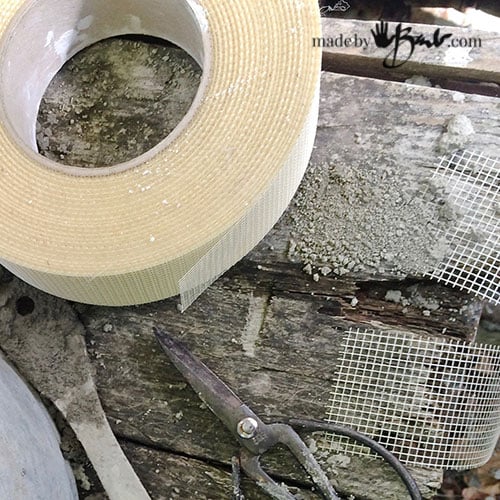
Drywall mesh acts as a reinforcement that can be cut and covered with concrete. If it is visible after curing it can be burnt away with a little torch.

You can also buy reinforcing fibres that are added to the mix. These work great as I have seen pieces that crack but hold together since there is the cross lacing of the fibres.
Anything that does not stretch can act as a reinforcement. Chicken wire, other metal mesh, yarn, wire, even fabric will add strength.
“How do I finish the rough edges?”
I admit, I hate sanding! I do not want to make a cloud of dust! So I design ways to keep that part to the minimum. That is why I like the rustic edges. There are times where you may have mixed a bit too much concrete, don’t throw it away! Make a ‘patty’ on some smooth surface (plastic is best) and let set.

This is now a great ‘sanding disc’, instead of using sandpaper or emery cloth. Also if you work with the pieces wet, there will be no dust and it will work well enough to take off the sharp corners.
I like to come up with projects where the rough edges are part of the design as in the LIVE EDGE CONCRETE BOWLS. That’s an artist’s trick; make any ‘mistake’ look intentional…
Simple Clean up:
Fill a very large bucket with water. If you need to get your hands or utensils clean use the bucket of water like a sink (I keep a rag nearby to dry). The particles will settle and you can use this for a while. When done, pour off the water and let the bottom sludge harden/dry to be knocked out.

So, there you have it! It isn’t as bad as you had imagined?! I hope I have taken away some of the fear of being covered in concrete. It is similar to working with plaster of paris but is much more durable. Go check out all the concrete projects I have and give it a shot! I know you can do it!
See this post before you go to the concrete store…
I just started dabbling in this concrete business. I’ve been making bowls.planters etc….I have people wanting to buy but I don’t know how to properly wash the concrete and how long this process takes. Also I’ve had requests for a birdbath which I will handprint on the outside but I guess I would leave the inside plain …but I want it to be safe for the little critters… would u please advise? TIA 🙂
Some say to soak in water for a month. I have heard a bit of acid like vinegar can help take the alkali down but not too much as it will weaken the concrete. Eventually it will leach out when constantly refilling with water. The birds that drink from the sidewalk are fine. A sealer may give a temporary seal but I bet it would not last indefinitely as even pools need to be re-surfaced/painted. If you can testing with PH strips will help…
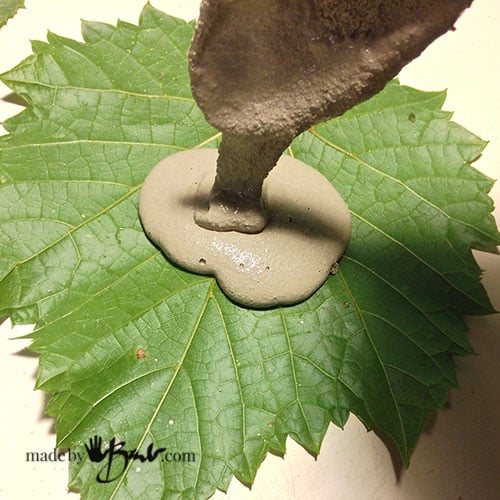
HELP! I did my first casting 3 days ago on a rhubarb leaf. I used 3-1 fine sand to Portland cement. I also added a little color and concrete bonding adhesive acrylic fortifier along with water. I thought I got it on the leaf fairly thick in the middle with it graduating down to maybe a 1/4″ or a little less on the edges. When finished, I covered the leaf with plastic and let it sit for 2 days. When I took the plastic off today, I had fine cracks all through the leaf and when I carefully turned it over and take the leaf off, the edges started crumbling and the whole thing falling apart. I also did this indoors so weather didn’t have a factor in this epic fail. What happeded???
Wow, I have not had that happen. It sounds strange as the fortifier should help. You did not make them how I do as I use a commercial sand-topping mix and don’t add fortifier. I have never seen fine cracks so I wonder if it had something to do with the colour or acrylic. Can you get the sandtopping mix as it is pretty cheap and foolproof. See how I make mine here 1/4″ is too thin for a regular mix. There is also the possibility that the portland cement was too old…
Barb,
From one artist to another artist, you are so kind to not only entice us with great ideas, you take the time to share great instructions. You seem so patient in your explanation. You are a great artist and I’ll bet a wonderful person in person, someone you would like as a neighbor and friend. Thank you for being you.
Joey
Hmmm, that’s quite interesting! I had no idea that much would through my writing. Yes, I have often been described as being very patient. So happy to hear it from another artist!
Hi Barb,
Thanks for your recent post Tips & Tricks of Cement Crafting. I have a question, when you are making the slurry for dipping cloth, how much portland cement do you use for each cup of water?
I don’t have an exact measurement as it depends on a few factors. Some fabrics are denser and some not so I may vary it slightly. I mix it to be thicker than milk, like melted ice cream. It needs to get into the fabric quite well to do it’s job. Recipes depend on humidity and also how packed it is… Don’t worry, you will figure it out!
I’d like to color my Portland cement and drop cloth strips. Is there a recipe for how much latex paint to mix with water? Or can you use 100% paint as a mixer? Will copper metallic acrylic paint retain its sheen?
In my experience it’s not quite like just mixing paint. I find it does sometimes make the concrete act weird like coagulating. When possible use colouring made for concrete. Concrete has a reaction that needs to take place, so too much paint may hinder that. I would do a small mix test sample. I’ve tried the metallic and it seems to get ‘lost’ in the muck of the concrete. I usually just add as a paint. Check back, I’m hoping to try something new soon… Good luck!
Can I use sawdust for concrete filler?
Since there is practice of making Hypertufa with additives like soil, perlite, and there is also papercrete which adds paper pulp, I’d say it is possible. It would absorb moisture as does the Hypertufa and papercrete so it acts different than regular concrete. I’d say it’s less strong as well. Hope that helps
Hi there
I need to make elephant tusks life size for a project.
Can you recommend the right white concrete I should try by chance.
I was gonna carve them out of soap stone but cant find any bulk stone this size and cost is up there lol.
Thank you
Ryan
It depends if they need to be pure white? The Rapidset Cementall is quite light coloured but not pure white. It is really strong and can be very smooth! There are some white portland cements available but then you’d have to mix it. Maybe look for a counter-top mix. Good luck!
Portland has white cement 20 lb bag on amazon prime for $19. I’d check local first.
Hey Barb, you have the BEST site on this subject. I cast and paint tetrapanax and elephant type leaves, some of which are quite large. I have to bathe the leaves in a vinegar/water spray for a few minutes and then neutralize it with a baking soda/water mix in order to prevent chalking on the paint. I let them cure for three days, neutralize and then I can paint and finish with a clear coat spray. Do you experience chalking or don’t you paint them?
In my observation of concrete that has been sealed I always see that it fails after time. I actually like the look of uncoloured aged concrete, even if it gets a bit green/mossy. If it’s meant to be indoors then I may use an acrylic sealer. The rapidset Cementall has no efflorescence. Leaf casting is so much fun!
Very amazing and informative content! Appreciate you for making the effort! Look forward to more.
Thanks!
Hi, a question re soda cans as moulds for concrete, you mention pushing the bottom of can with a broom handle, that would not give a flat bottom to the item being moulded?
The idea is not to push it out that far, just enough to get rid of the way it is very indented. Cans are designed to old shape well and the bottoms are very concave which will just not allow you to pull out the concrete. Just flatten it enough… Hope that helps.