Tips & Tricks for Concrete Crafting
For many the idea of being creative with concrete brings visions of huge metal mixers, shovels and mess. Let me show you some of my Tips and Tricks for Concrete Crafting so you too can make concrete art, like baking a cake.

It’s no mystery that I have quite the love for working in concrete. My fascination with casting things from molds started as a little kid and led me to this. Before I knew it I had used a bunch of different Concrete mixes, made my own and created quite the slue of original projects. I learned from ‘hands-on’ experimentation to create my own easy system that makes it all mess free and simple.
“What is concrete?”
The term ‘concrete’ is for a material that is created from a mix of aggregates with a cement that is activated with water. Once it goes through it’s reaction, which usually involves some heat production it ends up almost as hard as stone. Lime-based Portland cement is commonly used and mixed with gravel (crushed stone) to make the typical mix used for your sidewalks. But as a crafter I often use a finer mix but there are still a few to choose from.
Question: “What concrete mix should I use?”
I get many questions about this. If you get the wrong mix, it will usually not work. Many of my projects are designed with the character of the mix. This post will also help explain the pre-made mixes.
Portland Cement
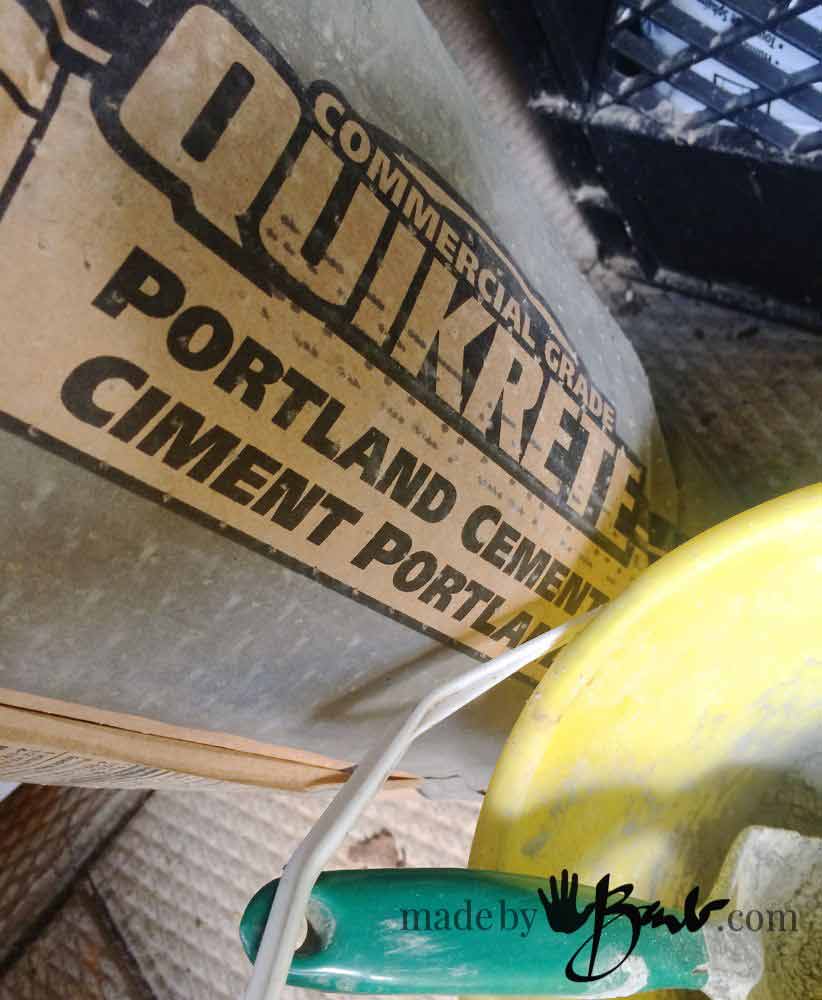
Portland Cement can be purchased as is so that you can make your own mix by adding other aggregates. It is also used when making ‘HyperTufa’. Depending what you mix into the portland cement will determine the final characteristics. It can range from just sand to perlite, peat, vermiculite, paper, styrofoam and probably more I’ve yet to discover.
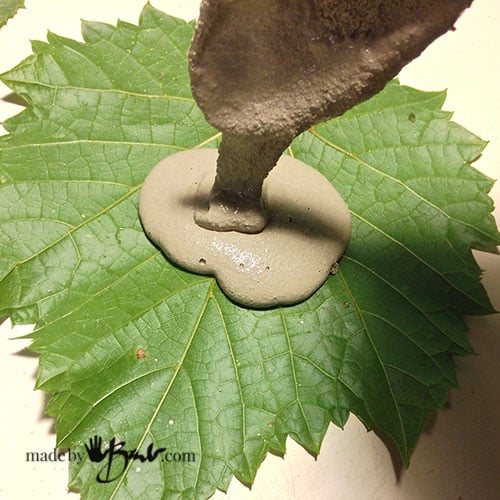
If you want total control, this would be your choice as you are starting from ‘scratch’. I use this when making the CONCRETE ORBS using some dipping of yarn, and also the STEP SPOOK. In those cases the fabric fibres are the ‘aggregate’. Paper can be used as an additive and works quite well as in my PAPERCRETE BIRD

Sand Topping Mix
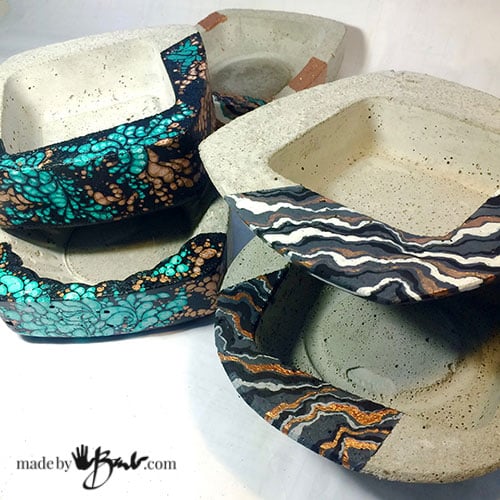
Sand Topping Mix is also one of my favourites. It is a simple mix of portland cement and sand. This inexpensive mix is meant to be used at less than 2″ thickness so it was perfect for the STEPPING STONES which were my first concrete adventure many years ago. They still grace my garden and are aging nicely. It has a fair strength when used at thicknesses over 3/8″ and worked well for the making of BOWLS and LIVE EDGE BOWLS and casting LEAF PLANTER. If you are new to concrete this is a good way to experiment. It can not be used at a very thin thickness.
Setting time is not accelerated and will need a good 24 hours before unmolding.

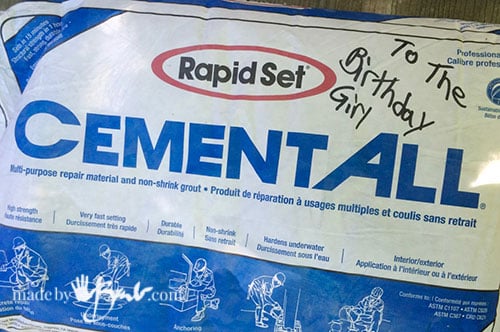
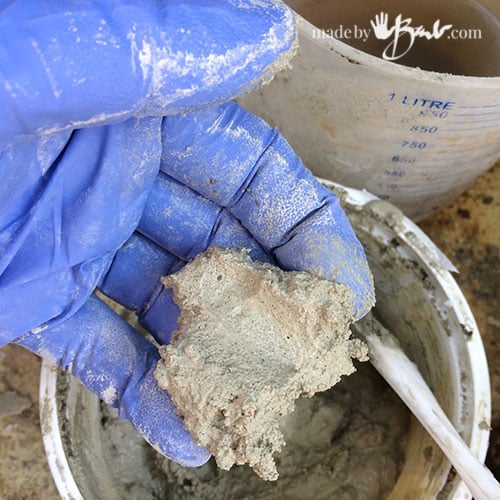
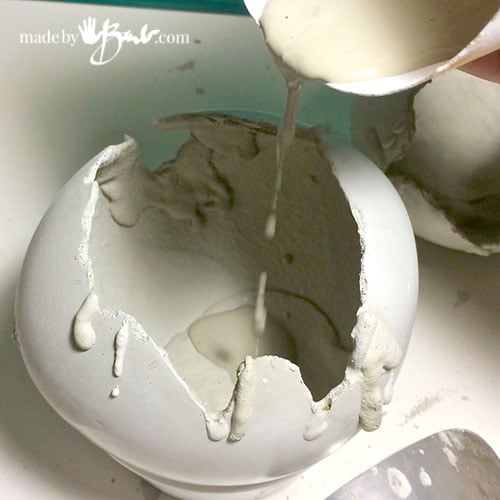
RapidSet Cementall
Rapidset Cementall is a brand name for a quickset concrete. This mix acts quite differently as it sets really quickly (5 minutes) and can be unmolded in 1 hour. I love this mix since I am impatient, but also because it is super strong! I experimented and have used it at 1/8″ thick with good strength (obviously not walking on) as it my LEAF COASTERS. This mix can be used at different consistencies such as pourable or thicker malleable concrete. This pourability has allowed the ‘slush pouring’ of the CUTE HEADS and the TIN CANS, and even the EGGS. Thicker use has allowed the sculpting of the LEAF CIRCLES and the hilarious SMILING STONES and LARGE FACE SCULPTURE. Even the GEODES and GEODE LAMP used this mix!
There is something about this mix that does make the end product much finer though, as there are many additives to set it quick and add that strength. If you like the more rough industrial look this concrete has less of that since the aggregates are very very (powdered sugar-like) fine. Those are decisions you have to make. It is also more expensive due to those ingredients.


If you would like to see side-by-side comparison of a few mixes visit my post about fast-set and extra strength mixes.

Top’n Bond
Sakrete Top’N Bond is a form of a patching concrete which makes it adhere to existing concrete. It is sometimes called vinyl patch as there are added polymers. It has a good strength at minimal thickness and also some has malleability. The final product does have the coarser texture since there is sand in the mix. It has a medium setting time so it worked well for the GIANT ORBS since they are worked in stages.
“What do I need to Work with concrete?”
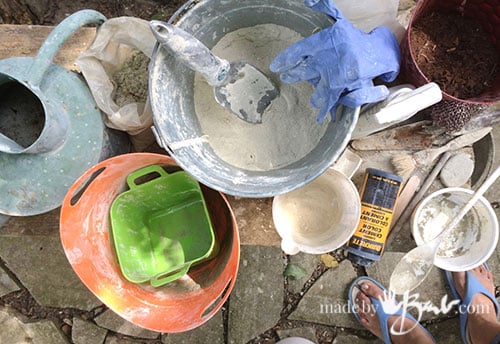
This is a what my collection of concrete ‘stuff’ looks like. It is really quite simple and I have quite the system now.
- Watering Can – is great as it just needs a bit of a tip to dispense, no fussing with a hose.
- Bucket of Concrete Mix and Scoop – keep this scoop dry and in the container to be able to add mix when needed.
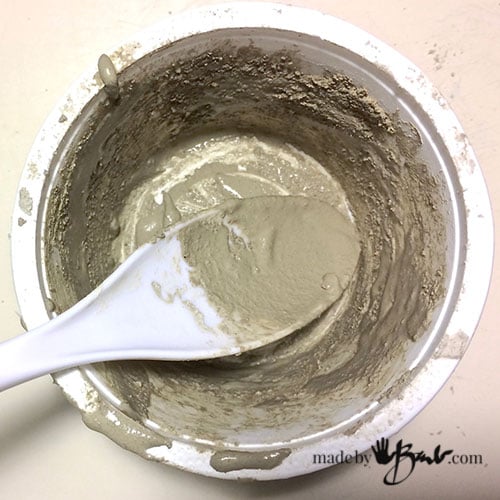
- Plastic Mixing Containers – It is best if these are not too rigid (Yogurt containers work well). Wider containers are better for mixing than tall ones.
- Measuring Cup to dispense small amounts of water into the mixing container.
- Rubber or Nitrile Gloves – better quality makes them last longer.
- Dust Mask – rated for concrete silica dust I like my 3M8833 as it has an exhale valve.
- Spray Bottle with water – to mist when adding to existing dry concrete
- Mixing Spoons/Utensils – Plastic or wood
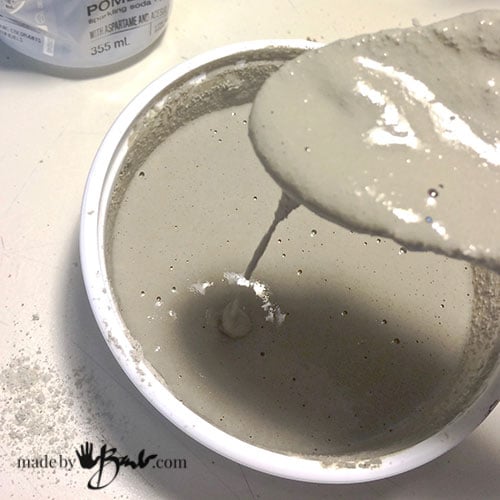
- Concrete Colour – if you would like a darker or tinted colour ( acrylic paints can work as well)
- Optional; Additives – if making a custom mix like Hypertufa or Papercrete; peat, sand, perlite, vermiculite, paper fibres, etc.
- Other Tools – like brushes, sticks, skewers, depending on project
“How To Work with Concrete and not make a big Mess?”

Step #1
Use the scoop and place some ‘mix’ into the mixing vessel
Step #2
Use the measuring cup to add water slowly, mixing after each addition. The consistency that is needed will depend on the particular project and type of mix. The Rapidset Cementall works better if the water is added first. (each project tutorial also has details) Then follow the instructions to make your ‘great concrete project’.
Step #3
Do not wash anything, just let it set and dry. NEVER EVER wash it down the drain! It’s like NOT doing the dishes… We are not making a sidewalk here, usually just smaller craft objects.

Step #4
Once it is hard, just flex the container and the concrete will chip off. Bang it a bit and it will be clean enough for the next use. I like to use recyclable yogurt containers. Plastic buckets work well if you are working a bit larger scale.

Flex the spoon as well and it will become clean too.

Keep a bucket for all the cast off concrete. It can be used as aggregate later on or other planting uses. No mess or fuss!
“How do I make the concrete stronger?”
There may be times where you need a bit of assurance that your project won’t just crumble into pieces. In the big professional world they use steel rebar rods inside the concrete. We can use other methods of adding some reinforcement.
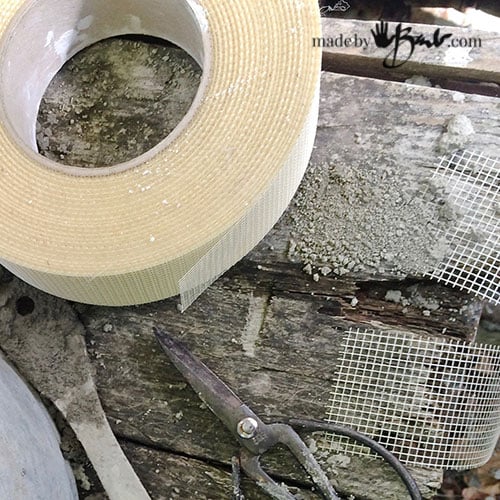
Drywall mesh acts as a reinforcement that can be cut and covered with concrete. If it is visible after curing it can be burnt away with a little torch.

You can also buy reinforcing fibres that are added to the mix. These work great as I have seen pieces that crack but hold together since there is the cross lacing of the fibres.
Anything that does not stretch can act as a reinforcement. Chicken wire, other metal mesh, yarn, wire, even fabric will add strength.
“How do I finish the rough edges?”
I admit, I hate sanding! I do not want to make a cloud of dust! So I design ways to keep that part to the minimum. That is why I like the rustic edges. There are times where you may have mixed a bit too much concrete, don’t throw it away! Make a ‘patty’ on some smooth surface (plastic is best) and let set.

This is now a great ‘sanding disc’, instead of using sandpaper or emery cloth. Also if you work with the pieces wet, there will be no dust and it will work well enough to take off the sharp corners.
I like to come up with projects where the rough edges are part of the design as in the LIVE EDGE CONCRETE BOWLS. That’s an artist’s trick; make any ‘mistake’ look intentional…
Simple Clean up:
Fill a very large bucket with water. If you need to get your hands or utensils clean use the bucket of water like a sink (I keep a rag nearby to dry). The particles will settle and you can use this for a while. When done, pour off the water and let the bottom sludge harden/dry to be knocked out.

So, there you have it! It isn’t as bad as you had imagined?! I hope I have taken away some of the fear of being covered in concrete. It is similar to working with plaster of paris but is much more durable. Go check out all the concrete projects I have and give it a shot! I know you can do it!
See this post before you go to the concrete store…
Barb-fantastic info
I want to make smaller orbs to fill with water and float a votive. My vision is slightly more textured exterior on an orb about 12 inches. Any suggestions for which concrete to use as I may have to create in sections over a few sessions. The thickness could be up to one inch.
Assume interior has to be waterproof as well-suggestions as to paint type?
Thanks,
Terry
Have you seen these? They could be made with just concrete. I’d say they are still slightly smaller than 12″.
I had the intention of testing some waterproofing last year. I used 3 vessels made with the Rapidset cementall and 3 different interior methods. What I found was that that concrete was so dense that the water did not penetrate at all over a length of time in any of them or even natural. Sooo, maybe you don’t need to coat the inside. I think it would be problematic to have a waterproof paint unless you use something like a pool paint. You could also keep them thinner as this is strong concrete (see these) Let me know how you make out Good Luck!
I’m looking for a way to cement my little daughters sneakers. You know, stick them out in the garden. I haven’t worked with quickcrete but I’m hoping the rapid set you mentioned works best. Any advice? Maybe you have dipped some boots for planters? I have some little rain boots I could ‘Crete instead of the sneakers.
The rapidset does turn out the hardest and quickly. The problem is that in order to harden them the concrete needs to get into the fabric enough to build up some thickness. You could add repeated layers to thicken it but then the details are often lost. I find that the mixes have sand in them so its harder to get into the fabric. Portland cement will be more smooth to be able to impregnate the fibres. Maybe a combination of a good portland dip and then some extra layering… Have you looked at the Ghoul and witch?
Hi. I am very new at this. I am trying to cover with concrete a half pipe for finger boards that I made out of wood. What kind of concrete shoul I use? Thanks
Hmmm, I suspect that it’s a wood box shape with a ‘half pipe’ hollow section. If there is a good thickness to the form you could use a simple Sand topping mix. If you are worried about cracking you could add some fibres or internal reinforcement metal or wire. It is strong enough for my Stepping Stones and finished pretty flat. If it is thinner you could use a RapidSet Cementall as it sets really fast and is much harder and smoother than usual concrete.
Do consider what surface will be touching the concrete as you may need some mold release. (oil, or spray)
Hi Barb -love your ideas and suggestions. I am a concreteaholic and use sand and non sanded grout for a lot of my projects mainly for the smoothness and color choices. What are your thoughts? I would love to chat-do you actually see my email address? First time I’ve ever posted on here 😉
I have not used the grout other than the mixes that state they can be used a non-shrink grout. I know it seems complicated when shopping for mixes as they have multiple uses. The RapidSet Cementall seems like a grout and does cure so smooth that it will shine if cast on a smooth surface. That is how I make the geodes You can add some colour to mixes as well.
Thanks for taking the time to write.
Thanks a lot for the super blog post.Hands down!
Kind regards: JimM
Hi Barb, i am following all your fab work, i am interested in making the Draped Hypertufa Planters, i live in Ireland, and i see you use portland cement, is that just an ordinary cement, i can’t find the portland cement here only our Irish Cement, also is there any sand to be used, Many thanks for reading this and keep up the great work.
Jacky
Portland cement is the active part in most mixes that contain sand and sometimes gravel (aggregate). It is quite fine in nature and I use it along with the fabric being the aggregate. You could add sand and peat etc but it tends to sit on the surface since it won’t get absorbed by the fibres. As I researched I believe the Irish cement is indeed portland see here Ask if it has additives like sand or gravel. Good luck. You may also like this fellow as he is also a draped concrete
Hi Bab,
Awesome ideas you have. I see recommendations elsewhere to not paint any concrete creations until it has set for 27-30 days. What say you?
TY
I tend to not like painting outdoor ones at all. I may just do some antiquing or dry brushing. Concrete likes to breathe…
Thanks for the quick reply. This is for some small pieces that will primarily go indoors. I wanted to paint a little ‘gold’ in some intentional ‘cracks’. TY again
Hello love reading your posts, you have a wealth of information!!
I can’t seem to find any rapid set cement all here where I live Victoria, Australia is there another name for it or a similar product? Thanks
I think I was looking for someone and did notice there were a few choices. Look for fast setting (read specs on the bag and setting time), super strong and no minimum thickness (no stone in the mix) The very fast setting are usually significantly more expensive as well and mix differently with water. I hope that helps
I made a sculpture out of clay but I want to make copies out of cement. I’m worried about crevices in the original. Do you have any advice for making molds and casting cement?
See here: and also here You need to figure out where the seams or separation will be. Simple designs are best.
HI I’M FROM BRAZIL
I LOVE YOUR SITE
YOU’RE THE BEST
THANK YOU VERY MUCH
RIBEIRO NETO
How amazing is it that I can connect with the whole world?! Happy making!
Barb thank you. You’re a great inspritation and all your tips are so helpful.
I’m from India so you reach far and wide.
Thanks! The world is so much smaller now! Happy concreting!